Long Press Gesture Recognizer Starts Again When Moved
If you lot've been programming with SwiftUI before, you probably got a sense of taste of building gestures with SwiftUI. You utilise the onTapGesture modifier to handle a user's touch and provide a corresponding response. In this tutorial, let's dive deeper to come across how we work with diverse types of gestures in SwiftUI.
Editor's note: This is a sample chapter of Mastering SwiftUI. If you want to learn more about the SwiftUI framework, you can bank check out the volume here.
The framework provides several built-in gestures such every bit the tap gesture nosotros have used earlier. Other than that, DragGesture, MagnificationGesture, and LongPressGesture are some of the prepare-to-use gestures. Nosotros volition looking into a couple of them and see how we piece of work with gestures in SwiftUI. On elevation of that, y'all will learn how to build a generic view that supports the drag gesture.
Using the Gesture Modifier
To recognize a particular gesture using the SwiftUI framework, all yous need to practise is attach a gesture recognizer to a view using the .gesture modifier. Here is a sample code snippet which attaches the TapGesture using the .gesture modifier:
| var body : some View { Image ( systemName : "star.circle.fill" ) . font ( . arrangement ( size : 200 ) ) . foregroundColor ( . green ) . gesture ( TapGesture ( ) . onEnded ( { print ( "Tapped!" ) } ) ) } |
If you want to endeavor out the code, create a new project using the Unmarried View Application template and make sure yous select SwiftUI as the UI option. So paste the code in ContentView.swift.
By modifying the code above a bit and introducing a land variable, we can create a unproblematic calibration animation when the star epitome is tapped. Here is the updated code:
| i two 3 four 5 half dozen 7 8 9 ten 11 12 13 fourteen 15 xvi 17 | struct ContentView : View { @ Country private var isPressed = false var trunk : some View { Image ( systemName : "star.circle.fill" ) . font ( . arrangement ( size : 200 ) ) . scaleEffect ( isPressed ? 0.five : 1.0 ) . blitheness ( . easeInOut ) . foregroundColor ( . dark-green ) . gesture ( TapGesture ( ) . onEnded ( { cocky . isPressed . toggle ( ) } ) ) } } |
When you run the code in the sail or simulator, you should see a scaling issue. This is how you lot can utilize the .gesture modifier to detect and reply to sure touch events.
Editor'due south note: If you lot don't know how the blitheness works, you can check out our new book – Mastering SwiftUI.

Using Long Printing Gesture
I of the born gestures is LongPressGesture. This gesture recognizer allows you to discover a long-printing effect. For case, if you want to resize the star image simply when the user presses and holds information technology for at least i second, you lot can use the LongPressGesture to observe the touch issue.
Modify the code in the .gesture modifier like this to implement the LongPressGesture:
| . gesture ( LongPressGesture ( minimumDuration : 1.0 ) . onEnded ( { _ in self . isPressed . toggle ( ) } ) ) |
Run the project in the preview canvas to have a quick test. Now you accept to press and concur the star image for at least a second before it toggles its size.
The @GestureState Property Wrapper
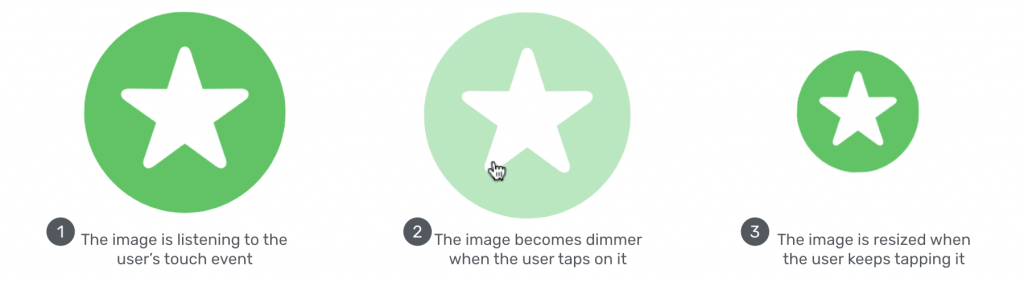
When you printing and concur the star epitome, the image doesn't give users whatsoever response until the long printing event is detected. Obviously, in that location is something we can do to improve the user experience. What I want to practice is to give the user an immediate feedback when he/she taps the image. Any kind of feedback will aid improving the situation. Say, we tin dim the image a bit when the user taps it. This only lets the user know that our app captures the touch on and is doing the work. The effigy below illustrates how the animation works.
To implement the animation, one of the tasks is to keep runway of the state of gestures. During the operation of the long printing gesture, we have to differentiate the tap and long printing events. Then, how tin nosotros exercise that?
SwiftUI provides a property wrapper chosen @GestureState which conveniently tracks the country modify of a gesture and lets developers decide the corresponding action. To implement the blitheness we only described, we can declare a property using @GestureState like this:
| @ GestureState private var longPressTap = faux |
This gesture state variable indicates whether a tap result is detected during the performance of the long press gesture. Once you accept the variable defined, yous tin can alter the code of the Paradigm view similar this:
| Epitome ( systemName : "star.circle.fill" ) . font ( . organization ( size : 200 ) ) . opacity ( longPressTap ? 0.four : i.0 ) . scaleEffect ( isPressed ? 0.5 : 1.0 ) . animation ( . easeInOut ) . foregroundColor ( . dark-green ) . gesture ( LongPressGesture ( minimumDuration : ane.0 ) . updating ( $ longPressTap , torso : { ( currentState , state , transaction ) in state = currentState } ) . onEnded ( { _ in self . isPressed . toggle ( ) } ) ) |
We only made a couple of changes in the code above. First, it'south the addition of the .opacity modifier. When the tap event is detected, nosotros set the opacity value to 0.4 then that the prototype becomes dimmer.
Secondly, it's the updating method of the LongPressGesture. During the performance of the long press gesture, this method volition exist chosen and it accepts iii parameters: value, state, and transaction:
- The value parameter is the electric current country of the gesture. This value varies from gesture to gesture, but for the long press gesture, a
truthfulvalue indicates that a tap is detected. - The state parameter is really an in-out parameter that lets yous update the value of the
longPressTapproperty. In the code higher up, nosotros set the value oflandtocurrentState. In other words, thelongPressTapproperty always keeps track of the latest state of the long press gesture. - The
transactionparameter stores the context of the current land-processing update.
Afterward you made the code modify, run the project in the preview canvas to test it. The image immediately becomes dimmer when you tap it. Keep holding information technology for one second then the image resizes itself.
The opacity of the image is automatically reset to normal when the user releases the finger. Have you lot wondered why? This is an advantage of @GestureState. When the gesture ends, it automatically sets the value of the gesture land property to its initial value, that'southward false in our case.
Using Drag Gesture
Now that yous should understand how to utilize the .gesture modifier and @GestureState, let's look into another mutual gesture: Elevate. What nosotros are going to do is alter the existing lawmaking to support the drag gesture, allowing a user to elevate the star paradigm to motion it around.
Now replace the ContentView struct like this:
| one ii 3 four five 6 vii viii 9 10 xi 12 13 14 15 16 17 eighteen | struct ContentView : View { @ GestureState private var dragOffset = CGSize . zilch var body : some View { Epitome ( systemName : "star.circle.fill" ) . font ( . system ( size : 100 ) ) . starting time ( x : dragOffset . width , y : dragOffset . meridian ) . animation ( . easeInOut ) . foregroundColor ( . greenish ) . gesture ( DragGesture ( ) . updating ( $ dragOffset , body : { ( value , state , transaction ) in state = value . translation } ) ) } } |
To recognize a drag gesture, y'all initialize a DragGesture instance and mind to the update. In the update office, we pass a gesture land holding to go on rail of the elevate issue. Similar to the long press gesture, the closure of the update function accepts 3 parameters. In this instance, the value parameter stores the current data of the drag including the translation. This is why we set the state variable, which is actually the dragOffset, to value.translation.
Run the project in the preview canvass, y'all can drag the image around. And, when you release it, the epitome returns to its original position.
Practise y'all know why the image returns to its starting indicate? As explained in the previous section, ane reward of using @GestureState is that it volition reset the value of the belongings to the original value when the gesture ends. So, when you release the finger to end the drag, the dragOffset is reset to .zero, which is the original position.
But what if yous want to continue the epitome to stay at the cease point of the elevate? How can you do that? Give yourself a few minutes to think near the implementation.
Since the @GestureState property wrapper will reset the belongings to its original value, we need some other state property to salve the final position. Therefore, let's declare a new state property similar this:
| @ Land private var position = CGSize . aught |
Next, update the body variable like this:
| i 2 3 4 five 6 7 viii nine 10 11 12 13 fourteen 15 16 17 xviii | var body : some View { Image ( systemName : "star.circle.fill up" ) . font ( . system ( size : 100 ) ) . kickoff ( x : position . width + dragOffset . width , y : position . height + dragOffset . peak ) . animation ( . easeInOut ) . foregroundColor ( . green ) . gesture ( DragGesture ( ) . updating ( $ dragOffset , torso : { ( value , state , transaction ) in state = value . translation } ) . onEnded ( { ( value ) in self . position . height += value . translation . pinnacle cocky . position . width += value . translation . width } ) ) } |
We take fabricated a couple of changes in the code:
- Other than the
updatefunction, nosotros also implemented theonEndedfunction which is called when the drag gesture ends. In the closure, we compute the new position of the epitome by adding the elevate first. - The
.offsetmodifier was also updated, such that we took the current position into account.
Now when you run the project and drag the prototype, the image stays where it is even after the drag ends.
Combining Gestures
In some cases, you need to use multiple gesture recognizers in the same view. Let'southward say, if we want the user to press and hold the paradigm earlier starting the elevate, nosotros have to combine both long press and elevate gestures. SwiftUI allows yous to easily combine gestures to perform more complex interactions. It provides 3 gesture composition types including simultaneous, sequenced, and sectional.
When you demand to detect multiple gestures at the same time, you use the simultaneous limerick blazon. And, when yous combine gestures exclusively, SwiftUI recognizes all the gestures you specify but it will ignore the rest when i of the gestures is detected.
Every bit the name suggests, if you combine multiple gestures using the sequenced limerick type, SwiftUI recognizes the gestures in a specific order. This is exactly the blazon of the limerick that we volition use to sequence the long printing and drag gestures.
To work with multiple gestures, y'all can update the code like this:
| 1 2 iii 4 5 half dozen 7 viii 9 10 xi 12 13 14 15 16 17 18 19 20 21 22 23 24 25 26 27 28 29 30 31 32 33 34 35 36 37 38 39 40 41 42 43 44 45 | struct ContentView : View { // For long press gesture @ GestureState private var isPressed = fake // For elevate gesture @ GestureState individual var dragOffset = CGSize . goose egg @ State private var position = CGSize . zip var body : some View { Epitome ( systemName : "star.circumvolve.fill" ) . font ( . organization ( size : 100 ) ) . opacity ( isPressed ? 0.5 : ane.0 ) . showtime ( ten : position . width + dragOffset . width , y : position . top + dragOffset . height ) . blitheness ( . easeInOut ) . foregroundColor ( . greenish ) . gesture ( LongPressGesture ( minimumDuration : ane.0 ) . updating ( $ isPressed , body : { ( currentState , state , transaction ) in state = currentState } ) . sequenced ( before : DragGesture ( ) ) . updating ( $ dragOffset , body : { ( value , land , transaction ) in switch value { case . first ( truthful ) : print ( "Tapping" ) case . second ( true , let drag ) : state = drag ? . translation ? ? . zero default : intermission } } ) . onEnded ( { ( value ) in guard case . second ( true , permit drag ? ) = value else { return } cocky . position . height += elevate . translation . meridian self . position . width += elevate . translation . width } ) ) } } |
Yous should exist very familiar with part of the code snippet considering nosotros are combining the long press gesture that nosotros have built with the elevate gesture.
Permit me explain the code in the .gesture modifier line past line. Nosotros require the user to press and hold the image for at least one second before he/she tin can begin the dragging. So, we start past creating the LongPressGesture. Similar to what nosotros accept implemented before, we have a isPressed gesture state property. When someone taps the image, we will modify the opacity of the prototype.
The sequenced keyword is how we can link the long printing and drag gestures together. We tell SwiftUI that the LongPressGesture should happen earlier the DragGesture.
The code in both updating and onEnded functions looks pretty similar, but the value parameter now actually contains 2 gestures (i.e. long press and drag). This is why we take the switch argument to differentiate the gesture. You can use the .first and .second cases to find out which gesture to handle. Since the long printing gesture should exist recognized before the drag gesture, the beginning gesture here is the long printing gesture. In the lawmaking, we exercise aught simply just print the Tapping message for your reference.
When the long press is confirmed, nosotros will reach the .2d instance. Here, we pick up the drag information and update the dragOffset with the corresponding translation.
When the elevate ends, the onEnded function will be called. Similarly, we update the final position by figuring out the drag data (i.e. .second case).
Now yous're set up to test the gesture combination. Run the app in the preview canvas using the debug, so y'all can see the message in the console. You can't drag the image until holding the star prototype for at least one second.
Refactoring the Lawmaking Using Enum
A improve style to organize the elevate land is past using Enum. This allows you lot to combine the isPressed and dragOffset state into a unmarried property. Let's declare an enumeration called DragState.
| ane ii three 4 five half dozen 7 8 9 10 11 12 13 14 15 16 17 18 19 20 21 22 23 | enum DragState { case inactive case pressing case dragging ( translation : CGSize ) var translation : CGSize { switch self { example . inactive , . pressing : return . zero example . dragging ( let translation ) : return translation } } var isPressing : Bool { switch self { case . pressing , . dragging : render true case . inactive : return false } } } |
Nosotros have iii states here: inactive, pressing, and dragging. These states are good enough to correspond the states during the performance of the long printing and elevate gestures. For the dragging state, it's associated with the translation of the elevate.
With the DragState enum, we can modify the original code like this:
| 1 2 3 iv five six seven eight 9 ten 11 12 13 14 15 16 17 18 19 20 21 22 23 24 25 26 27 28 29 thirty 31 32 33 34 35 36 37 38 | struct ContentView : View { @ GestureState private var dragState = DragState . inactive @ Country individual var position = CGSize . zero var torso : some View { Prototype ( systemName : "star.circle.fill" ) . font ( . system ( size : 100 ) ) . opacity ( dragState . isPressing ? 0.5 : i.0 ) . offset ( 10 : position . width + dragState . translation . width , y : position . superlative + dragState . translation . height ) . animation ( . easeInOut ) . foregroundColor ( . greenish ) . gesture ( LongPressGesture ( minimumDuration : 1.0 ) . sequenced ( before : DragGesture ( ) ) . updating ( $ dragState , body : { ( value , land , transaction ) in switch value { case . starting time ( true ) : state = . pressing case . second ( true , let drag ) : country = . dragging ( translation : drag ? . translation ? ? . aught ) default : pause } } ) . onEnded ( { ( value ) in guard case . 2nd ( true , let drag ? ) = value else { return } self . position . top += elevate . translation . elevation self . position . width += elevate . translation . width } ) ) } } |
We now declare a dragState property to track the drag land. By default, information technology'southward set to DragState.inactive. The code is nearly the aforementioned except that it'due south modified to work with dragState instead of isPressed and dragOffset. For instance, for the .start modifier, we retrieve the drag showtime from the associated value of the dragging state.
The issue of the code is the same. However, it's always a good practice to utilize Enum to track complicated states of gestures.
Edifice a Generic Draggable View
Then far, nosotros accept built a draggable image view. What if we want to build a draggable text view? Or what if we desire to create a draggable circle? Should you copy and paste all the code to create the text view or circumvolve?
There is always a ameliorate way to implement that. Allow's encounter how we can build a generic draggable view.
In the projection navigator, right click the SwiftUIGestures binder and cull New File…. Select the SwiftUI View template and proper name the file DraggableView.
Declare the DragState enum and update the DraggableView struct like this:
| 1 2 three 4 5 6 7 8 9 10 11 12 13 14 15 16 17 eighteen 19 xx 21 22 23 24 25 26 27 28 29 xxx 31 32 33 34 35 36 37 38 39 40 41 42 43 44 45 46 47 48 49 50 51 52 53 54 55 56 57 58 59 60 61 62 | enum DragState { case inactive case pressing case dragging ( translation : CGSize ) var translation : CGSize { switch self { case . inactive , . pressing : return . zero instance . dragging ( permit translation ) : return translation } } var isPressing : Bool { switch self { case . pressing , . dragging : return true case . inactive : render imitation } } } struct DraggableView < Content > : View where Content : View { @ GestureState individual var dragState = DragState . inactive @ State private var position = CGSize . nothing var content : ( ) -> Content var body : some View { content ( ) . opacity ( dragState . isPressing ? 0.five : 1.0 ) . offset ( x : position . width + dragState . translation . width , y : position . height + dragState . translation . height ) . animation ( . easeInOut ) . gesture ( LongPressGesture ( minimumDuration : 1.0 ) . sequenced ( before : DragGesture ( ) ) . updating ( $ dragState , trunk : { ( value , state , transaction ) in switch value { case . first ( truthful ) : country = . pressing case . second ( true , let elevate ) : state = . dragging ( translation : drag ? . translation ? ? . aught ) default : intermission } } ) . onEnded ( { ( value ) in guard example . second ( true , permit elevate ? ) = value else { return } self . position . height += elevate . translation . height self . position . width += drag . translation . width } ) ) } } |
All the code are very like to what you've written before. The tricks are to declare the DraggableView as a generic view and create a content holding. This property accepts whatsoever View and we ability this content view with the long press and drag gestures.
At present you tin can test this generic view by replacing the DraggableView_Previews like this:
| struct DraggableView_Previews : PreviewProvider { static var previews : some View { DraggableView ( ) { Prototype ( systemName : "star.circle.make full" ) . font ( . system ( size : 100 ) ) . foregroundColor ( . green ) } } } |
In the code, we initalize a DraggableView and provide our own content, which is the star image. In this case, you should achieve the same star image which supports the long printing and drag gestures.
So, what if we want to build a draggable text view? You tin supervene upon the lawmaking snippet with the following code:
| struct DraggableView_Previews : PreviewProvider { static var previews : some View { DraggableView ( ) { Text ( "Swift" ) . font ( . arrangement ( size : 50 , weight : . bold , design : . rounded ) ) . assuming ( ) . foregroundColor ( . reddish ) } } } |
In the closure, nosotros create a text view instead of the image view. If y'all run the project in the preview canvas, you tin can elevate the text view to movement information technology around. Isn't it absurd?
If you desire to create a draggable circumvolve, you tin can supplant the code like this:
| struct DraggableView_Previews : PreviewProvider { static var previews : some View { DraggableView ( ) { Circle ( ) . frame ( width : 100 , height : 100 ) . foregroundColor ( . purple ) } } } |
That's how you can create a generic draggable. Try to replace the circumvolve with other views to brand your own draggable view and have fun!
Summary
The SwiftUI framework has made gesture handling very like shooting fish in a barrel. As you've learned in this chapter, the framework has provided several set to employ gesture recognizers. To enable a view to support a certain blazon of gestures, all you lot need to practise is attach it with the .gesture modifier. Composing multiple gestures has never been so uncomplicated.
Information technology'southward a growing tendency to build a gesture driven user interface for mobile apps. With the piece of cake to use API, try to power your apps with some useful gestures to delight your users.
If you detect this tutorial helpful, you may want to cheque out our "Mastering SwiftUI" book. We will dive a fiddling deeper into SwiftUI gestures and prove y'all how to create an expandable bottom sheet, like to that you tin detect in the Facebook app.

Founder of AppCoda. Author of multiple iOS programming books including Start iOS Programming with Swift and Mastering SwiftUI. iOS App Developer and Blogger. Follow me at Facebook, Twitter and Google+.
Source: https://www.appcoda.com/swiftui-gestures/
0 Response to "Long Press Gesture Recognizer Starts Again When Moved"
Publicar un comentario